Monday, 8 December 2014

Practicing Ruby's design on Ruby


Ruby did a few changes the last time I practiced her design during the lesson. First of all she wants me to do more veins, which is generally fine with me but I don't want to do too many because I think it may be too much in the end and look overloaded. Also I should go down deeper with the eye shadow underneath the eye to give it a more 'dying' look. Otherwise everything else stays the same so I won't list every step here again.


->she still wanted soft edges and nicely blend out eye shadow but she also asked me to make it a bit darker


->something I struggled a bit every time I practiced was to get the eyes even-> in the end I would say I always did it but I had a lot to even out
->also the false eyelashes don't look to bad, definitely improved


->here you can clearly see that we applied more eye shadow underneath the eye to make it more ill-looking
->I tried to make the veins thinner but Ruby forgot her thin brush today so they were still too big even though I used the thinnest brush I had
->keep forgetting to use the MAC fixing spray in the beginning->but I don't think it matters that much
->something that annoys me a lot is that the base is coming off on the nose all the time->asked Kat and Sharon what to do and the suggested to buff and blend the base better but even after I did it, it kept coming off in funny patches-> also powdered well-> so I was thinking if it is maybe happening because the skin is too oily/dry? She has had quite dry skin the last time I worked on her face

Practcing Ruby's design on myself

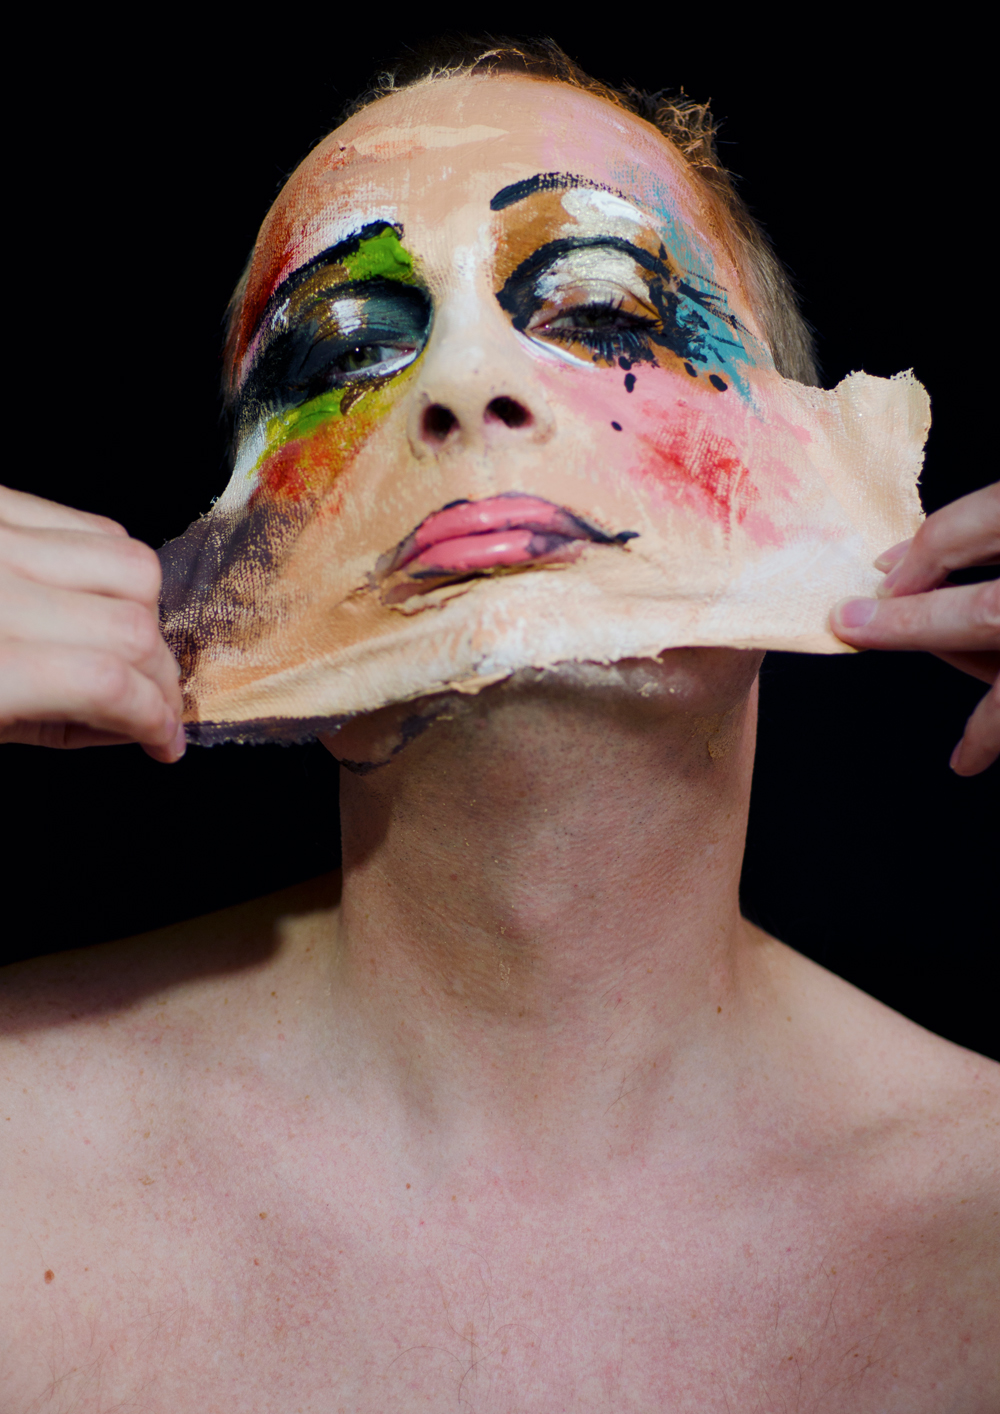
After I tried Ruby's design for the first time on her during the lesson I was worried about a few things. First of all the false eyelashes. I used false eyelashes before but I am not particularly good at applying them. And also drawing all the veins. But I just need to practice those bits more and then it should be fine. Otherwise I really like her design and the rest shouldn't be a problem.

You need:
  • Kryolan supercolor in white
  • Kryolan ultrafoundation palette
  • Kryolan gold aquacolor
  • Illamasqua translucent powder
  • Ruby's MAC moisturizer and fixing spray
  • orange blusher which Ruby will bring in
  • false eyelashes
  • eyelash adhesive
  • Illamasqua natural eye palette
  • MAC lip mix in red and blue, matt lip mix medium
  • Purple lip liner which Ruby will bring in
  • for the eyebrows I will use my Hello Kitty brown eye shadow palette
  • Foundation brush
  • 'White Pepper' and 'Caraway' from the Kryolan Viva Brilliant Medley Matt palette
  • Angled brush
  • round brush
  • powder brush
  • smaller roundish brush
  • a very thin brush for the veins
  • Illamasqua skin base
  • baby buds
->start with applying the MAC moisturizer and fixing spray
->mix the Kryolan white supercolor with 'Alabaster' from the Kryolan ultrafoundation palette to get a very pale base but not too white
->make sure to buff it well to make the base look very smooth and even
->powder
->contour the cheekbones with a mixture of 'White Pepper' and 'Caraway' from the Kryolan Viva Brilliant Medley Matt palette
->use orange blusher from Ruby's private Kryolan blusher palette and apply it in a roundish movement->afterwards soften it through buffing it out with the Illamasqua transluecent powder
->moving on to the eyebrows-> fill in the eyebrows with a lighter/medium brown from my Hello Kitty brown eye shadow palette ->make them look a little bit longer
->for the eyes mix the colors 'Vintage', 'Obsidian' and 'Wolf' from the Illamasqua palette together and apply it in the crease going down and wing liked out->blend it a lot to get it very soft
->apply the same eye shadow mixture under the eyes as well
-> you can go over again with the eye shadow if you want the color to be more intense, but remember to blend again to keep the edges soft
-> apply false eyelashes and then apply another layer of mascara to join the eyelashes
->take a very thin brush and start drawing the veins in gold using Kryolan aquacolor
->do random wiggly lines all around the face->when doing the chin/neck area go down the neck with the veins as well
->as well as in the hairline for a tiny bit to make it look more natural
->the veins don't have to be symmetrical
->lastly lips: use the matt MAC lip mix medium and mix it with the red and blue MAC lip mix
->first draw the outlines with a purple kip liner and then fill them in, in a kind of heart shape->take a baby bud and blend it out to get a kind of berry stained look->use some Illamasqua skin base and work it into the blending part as well
->afterwards go back to the golden auqacolor and apply some over the cupid's bow and on the center of the lower lip->blend it out a bit


NOTES ON MAKEUP DESIGN:
  • I think I did the eyes, lips and base very well here
  • especially like the eye shadow->nicely blended
  • I definitely have to practice applying the false eyelashes
  • also for the veins I have to use a really thin brush which I didn't do here
Otherwise I really enjoyed practicing Ruby's design. And if I keep practicing I won't have any time problems during the assessment.


Ruby's design


I really like Ruby's design and I think it will be fun to do it. In the Elizabethan time Elizabeth I. would draw small veins on her wrist or neck to make her look even paler. I like how Ruby used that idea but changed it into golden veins to make it contemporary. On the other side she keeps it Elizabethan by having a quite pale base ( even though it is not as white) and the soft blusher on the cheeks. Contemporary as well are definitely the dark eyes and purple lips. But she wanted the lips to look like they are stained which you can reference back to the Elizabethans as well because they didn't had proper lipsticks back then and used everything they could stain their lips with , like for example berries. 

Ruby practicing my design

FIRST PRACTICE


I was very pleased how Ruby applied my base and the contour. It looks very smooth and is blended well. She also tried very hard to get the eyebrows even. But it is a bit hard so I decided to provide her with stencils for the eyebrows , which will make it easier for her as well as save her time. The eyes are also not too bad but I don't want any blending between the gold and black. We were talking about how to improve doing the eyes and how she can get them even and we decided to maybe use tape or a ruler to get straight lines. She also did very well with blocking out the eyebrows. I especially like the left side. I am not very happy with the lips because I want proper heart shaped lips and Ruby took out the color on the lower lip way too much. What would maybe help is if she would draw the heart shape with a lip liner first. During the lesson she also didn't manage to apply the strap with the pearls underneath the eyes and didn't do the white eyelashes, but I am certain she will manage it during the timed assessment. She should definitely practice the design more to get more familiar with it otherwise I was quite pleased with it considering it was her first practice. We also took those picture in front of the black background where we will take our pictures of the timed assessment as well, to see if the contouring needs to be stronger for example.
SECOND PRACTICE
In the second practice she didn't finish the full look again but as I said I am confident that she can do it during the assessment. This time she draw the lines for the black eye shadow with a ruler and eye liner first to get both sides even and it work very well. But she forgot to go down the nose with the gold.I actually liked that version too, so we took pictures from the two different version so I could decide which I like the best. But I decided to stick with my original design. I was also pleased with the base and contour.

My final design + Step-By-Step Guide


As I already mentioned here I chose the editorial with Park Soo Joo from the Korean Vogue from December 2012 as my inspiration for my contemporary Elizabethan design.


My face chart

 You need:
  • Kryolan supercolor palette
  • Kryolan ultrafoundation palette
  • Illamasqua translucent powder
  • Illamasqua skin base
  • Kryolan blusher palette
  • Kryolan Viva Brilliant Color Medley Matt palette
  • MAC lip mix in red and black, mixing medium in shine
  • Illamasqua Reflection palette
  • pearls to stick on
  • Prit stick
  • Black circle lenses
  • Flower moistfull cream from Etude House
  • Nymph Aura Volumer from Etude House
  • ruler/tape
  • black/brown eye liner
  • brown/nude lip liner
  • eyebrow stencils
Start off with applying the Flower moistfull cream on the face. At the moment a have a few very dry patches in my face so it is especially important to moisturize.

Eyebrows:
  • block out eyebrows using glue
  • apply at least 3-4 layers of glue
  • powder
  • it doesn't matter if they still look a bit dark, it is important that they are smooth
Base:
  • mix white supercolor with 'Alabaster' from the ultrafoundation palette->use more of the white
  • start applying by covering the eyebrows first
  • also don't forget to cover ears and neck as well
  • powder well
  • strong contouring of cheeks, mix 101 and 665G from the blusher palette
Eyes:
  • mix 'Anis' from the Viva Brilliant palette with a tiny bit of water-> draw  thin and very long eyebrows above the blocked out eyebrows to give it more space for the eye shadow
  • I will provide stencils for the eyebrows to make it easier
  • Start with applying 'Graphic' from the Illamasqua Relfection palette and apply it in the middle of the eyelid and go until you almost reach the outer eye corner, take it up to the new eyebrows as well->you can use tape or a ruler to get perfect straight and even lines before you apply the eye shadow, just draw it with a black or brown eye liner
  • then apply the golden supercolor from the inner eye corner/ nose, cover part of the eyebrows as well and go up to the newly drawn eyebrows->then go to the outer eye corner and close it with the eyebrows in a diagonal line, after applying supercolor powder well to prevent greasy lines
  • under the eyes: apply pearls from the inner eye going up to the end of the eyebrows
  • whiten eyelashes using the Illamasqua skin base


Lips:
  • use red and black MAC lip mix and mix it with the shine mixing medium creating a nice deep brown
  • create a heart shape on lips with it, you can draw the outlines with a lip liner first
  • especially define the cupid's bow

->after you are done you could apply Etude House's Nymph Aura Volumer on top of the cheekbones to give it a dewy affect
->I will also apply black circle lenses before the makeup is applied because I think it would give a nice extra effect


Elizabeth: The Golden Age - Film review


We watched Elizabeth- The Golden Age during lesson at Uni and I have to say there were some interesting changes. 
Not only in Elizabeth's clothes,  hair and makeup but also in her personality.
First of all her dresses are more elaborate then before.
I especially like this one


In the first movie we saw at the end that she shaved her hair off and in this one you can see that she keeps it very short and just wears different wigs.

As well as her fashion her hairstyles became more elaborate too.


The only time she wore her hair loose again, when she was with her army waiting for the Spanish troops


Still from Elizabeth: The Golden Age


But I have to say that I was a bit disappointment about the makeup. I thought she would keep it like from the 'I married to England' scene from the first movie but compared to it , it was rather plain. Of course you still saw that the base was very pale but not as pale as I thought it would be.


But was I noticed it that Elizabeth looks in the second movie much more older and partly very tired and ill. You can see her damaged skin and wrinkles.

Something that  was very interesting to see was how much she needed Walter Raleigh( Clive Owen) around her later and how angry and disappointed she was at the end when she found out that Walter and her closest chamber lady Bess(Elizabeth) married and had a child. I remember very well how she said in the first movie that she doesn't need a man and that she is married to England but then you saw her being so dependent on Walter Raleigh. But I think that just shows how truly lonely she must have been.

Ellis Faas


About Ellis Faas

I will do just a short introduction about Ellis Faas. If you want to know more just visit her website.Ellis Faas was born 1962 in the Netherlands. Before becoming one of the greatest Make-up artist, she studied professional photography.  After working with Mario Testino in 1999 and travelling through fashion cities like Paris, New York, London and L.A "she met French fashion editor Emmanuelle Alt, who introduced her to Karl Lagerfeld"http://www.ellisfaas.com/brand/about/,which brought her the big success. 

IDENTITY REVEALED
BY
ELLIS FAAS
https://www.youtube.com/watch?v=taIWlCi9SxQ

When I saw Identity Revealed and read that Ellis Faas was to create masks inspired by  traditional mask from the natives from the Ivory Coast I was immediately reminded of the African masks we have at home. I think my mum and dad brought them back from one of their trips to either Tunesia or Gambia. I find it very astonishing how she recreated the mask by using different colors of paint/makeup as well as different materials and textures. Also the part when they try take rip off the masks is really cool.

"Since ancient times, humans have been using masks - in order to express power and authority; to feel self-confident; to stand out or to hide behind; to not be recognized and disappear into the masses. Not only by traditional masks, but also by disguising and ornamental elements such as clothing, jewellery, hair and makeup. But can one truly change one's identity, or is it merely a temporary transformation? And who or what defines someone's true identity? Is it the mask, is it the human being behind the mask, or maybe even the creator of the mask?"
https://www.youtube.com/watch?v=taIWlCi9SxQ


I think this statement says everything. So what do you think what or who defines your identity?


I am not really good at remembering names so when I first heard Ellis Faas I thought who is this? But then I had a look on her websites and I realized I actually have seen her work before. :) I think she is doing an amazing job. And you get so inspired after looking through her work. It is also very impressive to see for which brands, campaigns, magazines or photographers she has worked.

Just to list some of them.

Chanel
Paola Roversi
Dazed & Confused
MAC
Diane von Fürstenberg
Moschino
Boss Orange
Vogue
Helena Christensen
Givenchy
W Magazine
Jean-Paul Gaultier
Yves Saint- Laurent Haute Couture
Harper's Bazaar
Lancôme


And here is some of her work


http://www.ellisfaas.com/

Sephora

http://www.sephora.com/ellis-faas


http://citygirlinredlipstick.com/tag/sankta-lucia-ellis-faas/


http://www.ellisfaas.com/


http://www.skins.nl/merken/ellisfaas

Some screenshots from 'Identity Revealed'


http://www.examiner.com/article/ellis-faas-lends-her-creativity-to-the-magical-africa-exhibit


http://www.warpaintmag.com/2013/11/19/goingdutch/
You can also read a nice interview with Ellis Faas on thet website


http://softly.nothingspaces.com/2014/10/29/identity-revealed-a-filmed-triptych-by-ellis-faas/


Not is Ellis Faas an amazing Make-up artist, she also created and developed her own makeup products. And as seeing that not only normal people buy and use it, but also other Make-up artist work with her products must be a huge achievement for her. It also shows that her collection must be of a very good quality. I also like how her products are all in those pen's which makes it super easy to work with them but also very handy when travelling. I think that is apart from the quality another reason for other Make-up artist to work with Ellis' products.

You can see some of the Make-up artist that work with her products listed on her website.
But I will mention some as well

Megan Harrison
Yin Lee
Kakie
Margo Regan
Thomas Lorenz
Dirk Jensma
Adam De Cruz
Miriam Langelotti